Friday, 30 November 2012

Jillian from Paper à la Mode!

Hello everyone! Jillian here from Paper à la Mode! It's my time again to be Featured Designer! 

Today I'm showing a project I made with my niece as the subject. We went to the park and she had the best time in the leaves. I loved how her little nose got so red! I used Candi for the arrows and a little embellishment on the bottom! 


The type of Candi I used today is called "Icing Sugar".


You can find Craftwork Cards Candi at the following online retailers:


Thursday, 29 November 2012

Christmas Frame Ornament


Welcome to another Craftwork Cards Candi
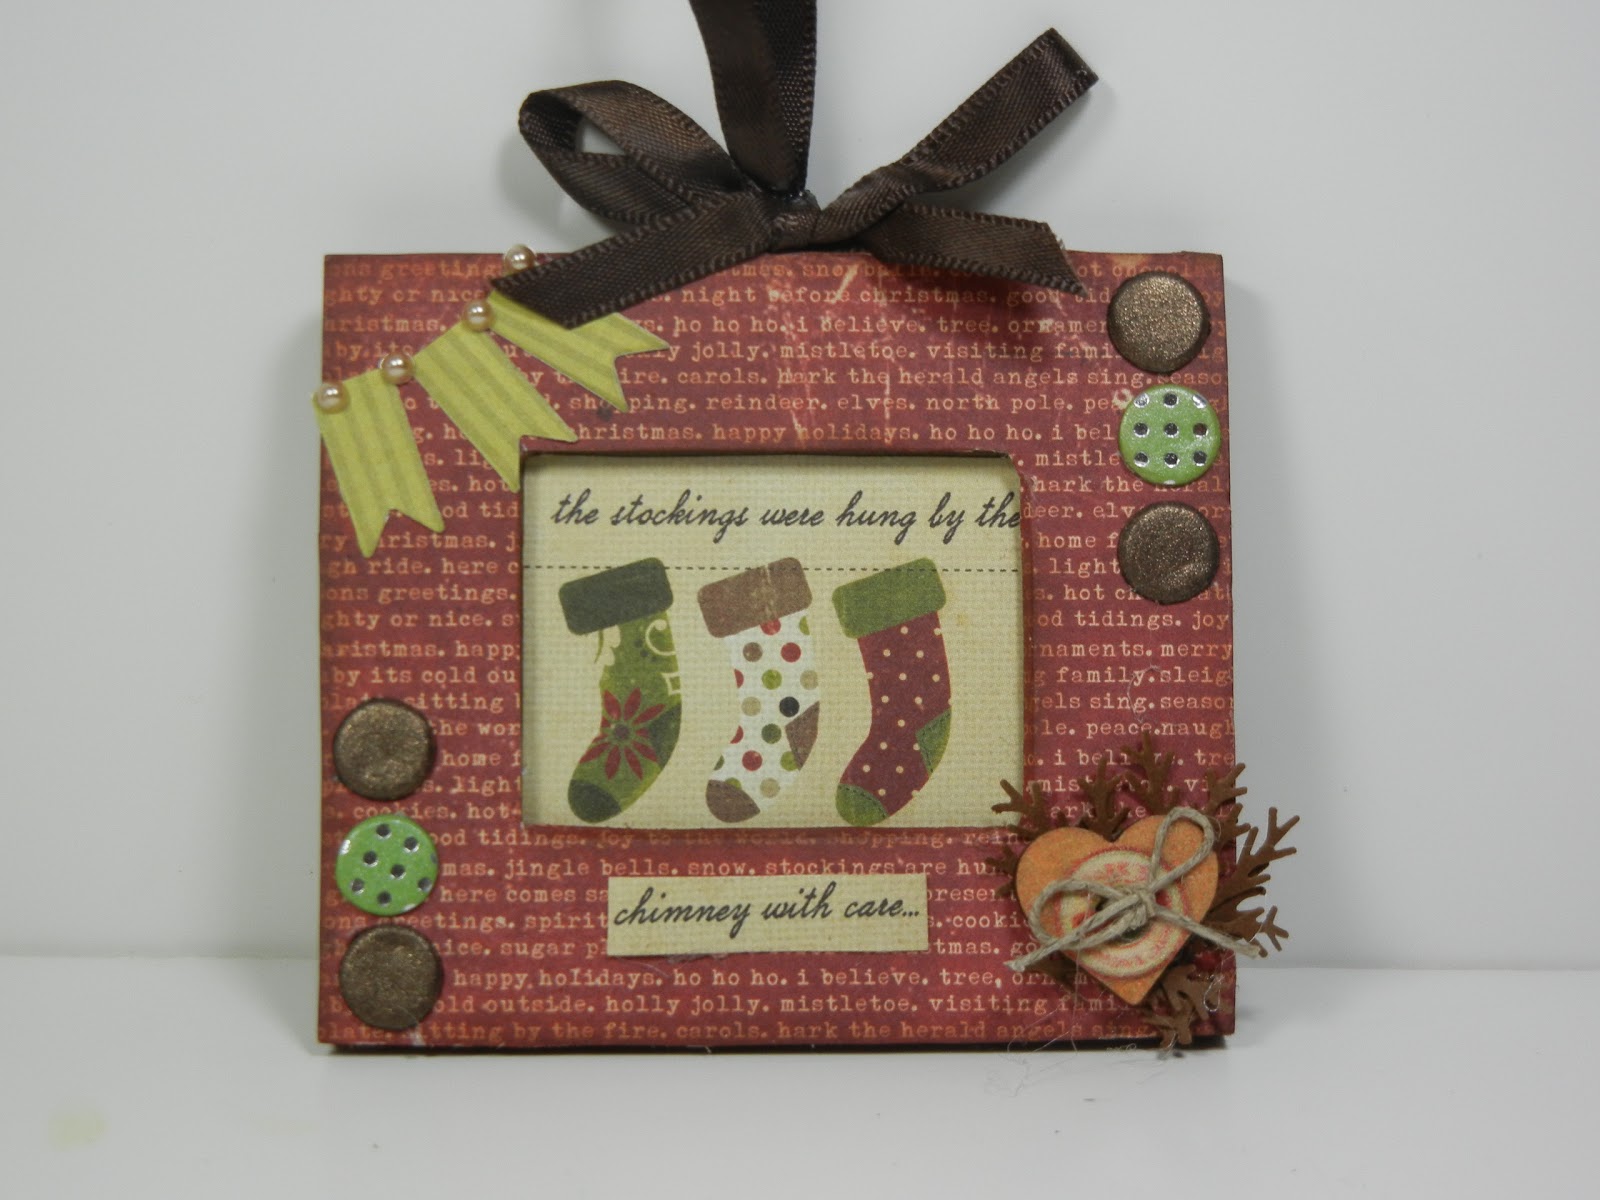
for my project to day I made this cute Christmas frame ornament. I bought this Kraft Frame from Hobby Lobby. I wish I would have bought more of them there is soo much you can do with these cute little frames. I found in the Christmas Craft section at Hobby Lobby for $1.00 on sale.
Below I used some Tim Holtz distress stain on the sides and the back of the frame. I then usd Simple Stories 25 Days of Christmas for the front of the frame, cut out the center of the frame with my craft knife and cut a image with the stocking inside the frame.

I then added embellishments to the frame I used the Craftwork Candi hot glued them on the frame, cut a banner from My Favorite Things banner, used Prima button hot glued it to the , Martha Stewart punch for the branch. then added some ribbon, Waaa Laaaa the finished product below.

Thank you for dropping in and visiting my blog. You can buy the Craftwork Candi from The Scrapbooking Queen Royal Shoppe and they are at a good price.

Wednesday, 28 November 2012

Lots of Dots

Good morning CANDi people! It’s Britt from Pink Paper Crowns here to share a card with you today!

When I start making a card or craft project I try to pick a uniting factor, for example, a paper line, a color scheme, a theme, or even a shape.  Giving myself parameters before I even begin my project helps me to decide what products to use and makes the whole experience more enjoyable.  I can focus on good design and the feeling I want for the project if I’m not bogged down with so many possibilities.

Today’s project theme: Dots ( I know, it’s a little obvious considering CANDi are dots. But, no one said I had to be original. : )

A theme or shape can be interpreted several different ways on one project and just by virtue of repetition (a good design word to remember) it will help bring everything together.

Nov2-Card

Cardstock: (tan) Creamy Cardstock by DCWV; (red) American Crafts | Patterned Paper (Nordic Holiday Collection 6x6) Basic Grey | Die: (‘Tis The Season) Sizzix for Basic Grey | Embossing Folder: (Bubbles) Sizzix | CANDi (Coffee Bean, Very Merry Silver) Craftwork Cards

---------------------------------------------------------------------------------------------------

1) Make card from cardstock. Emboss tan cardstock with embossing folder, adhere to card.

2) Die cut sentiment from patterned paper.

3) Trim strips from patterned paper, notch ends. Adhere to card with foam adhesive.

4) Adhere sentiment over notch-end strips.  Punch scalloped sections of patterned paper, adhere.

5) Use CANDi Fix to adhere coordinating Card CANDi to finish.

------------------------------------------------------------------------------------------------

Want some CANDi of your own? Get some at these online retailers:


Craftwork Cards - Candi - Shimmer Paper Dots - Dotty Coffee Beanimage

Thanks so much for taking a look at my CANDi project today! Come back tomorrow for even more CANDi-coated inspiration!
image

Tuesday, 27 November 2012

Holly Jolly Christmas CANDi...


Holly here from Ribbons & Glue sharing another fun project today using some Very Merry Silver CANDi ® goodness.  Did you know that you can now purchase CANDi® products in the US online? 

Here's where you can find yummy CANDi ® products:
These little embellishments are so fun to use!


For my CANDi® project this week, I decided to make a Christmas treat bag using a 6 x 12 sheet of embossed Coredination's Paper.  If you want to learn how to make a treat bag yourself, check out the link to Robin's video tutorial over at Robin's Creative Cottage.


I embellished my treat bag with a big ol' red grosgrain ribbon, some holly leaves cut from Cricut Creative Memories Cheerful Season, a stamped sentiment from Bug Bites and added some Very Merry Silver CANDi® on to my holly berries. 


Like Me on Facebook!

Monday, 26 November 2012

Oh Mickey....

Hello! I am thrilled to be back sharing another layout with you today! I have to be honest... since I have received my shipment of CANDi, I have added it to nearly every project I have worked on! I love the fun colors and patterns and the fact that it is so light weight!

This is a fun layout I created of my daughter who was having fun with the Mickey Mouse statue on Hollywood Blvd! 


The CANDi circles were easy to create and added some nice dimension to my page. They were much easier than brads would have been.. can you imagine poking all those holes and getting them spaced perfectly?!


To add interest, I made one large circle and one small circle. I used CANDi fix foam adhesive to adhere  this circle to the layout. I wanted the CANDi in the center of the flower to lay flat so it was adhered using regular glue. 

Rainforest
 
School Days
Coffee Bean
Would you like some CANDi?! You can find it HERE and HERE! 

Saturday, 24 November 2012

Candi Clear Ornament

Hi Everybody!
Jenny from Crazy About Cricut here, and I'm so super excited to share my first post as a Craftwork Cards Design Team member!  These little Candi's are such a fantastic addition to anybody's embellishment stash.  They give so much sparkle, and dimension to projects.  They look just like brads, but without the pain of having to split the prongs apart!  They can be used in so many places, so I decided to create an ornament.  Here's how it turned out:


*Michael's Craft Stores - clear glass ornament
*Scotch - Permanent Adhesive Dots (small)
*tulle from my stash


*It was really cool the dimension these Candi's added to this ornament!  And the sparkle that's on the Very Merry Silver Candi's is perfect for the holidays :)


*I used these Adhesive Dots, because they were small, flat, and most importantly clear.  This allows the ornament to look good from all angles, without showing any ugly glue spots.


I hope you enjoyed my project!  Make sure to check back here on the Craftworks blog for more gorgeous inspiration from the Craftwork Cards Design Team :O)

Until Next Time,
Jenny ~ Crazy About Cricut 

CraftWork Cards Store Link

CraftWork Cards Blog Link


Friday, 23 November 2012

A little CANDI anyone??


Welcome to a day to celebrate with CANDI!!!
My first official post for Craftwork Cards. I had such fun with this one.. This is what i came up with from a suggestion from a co-worker after i told her about me making this awesome design team..
Let's take a look..


I found this free digi image HERE. I coloured the background gumballs and the machine with promarkers and filled the rest in with School Days CANDI.
Candi - School Days
 
I just love this idea...how fitting...CANDI for the candy machine....
 
Many thanks for dropping by and hope to see you all again soon...